This article and all of the images within were created by the very talented Melissa St. James. Copyright © Melissa St. James. Check out her gallery here.
This is part 2 of the Making Skin Pop with the Daz Studio Iray Uber Shader tutorial. Here, we address tweaking a chromatic skin. Part 1 provides an introduction to Daz Studio Iray skin shaders as well as how to convert monochromatic to chromatic skin. Visit Part 1 here.
Tweaking a Chromatic Skin
- Open up a figure of your choice (I’m using Babina 8 for my example) in Daz Studio.
- Open up the Surfaces tab.
- You’ll notice that the SSS map slotted into the Translucency Color looks different this time – it would normally either be an exact copy of the Base Color map, or a lightened version of the Base Color map. (It is important to note that some skins might have a more in-depth SSS map that incorporates things like veins and vessels, but the vast majority are simple lightened versions of the Base Color map.) In the case of Babina 8, you will see the latter, a lightened version of the Base Color map.
- (Optional) If the skin you are working with uses a copy of the Base Color map slotted into the Translucency Color, I would recommend lightening it slightly in Photoshop. For a generalized process, start with the color map and add a Hue/Saturation Adjustment layer with the following settings – Hue -5, Saturation -15, Lightness +20. This might need to be tweaked depending on the skin. Once you have a lightened version of the color map, load this new SSS map into the Translucency Color slot and move to the next step.
- Change the Translucency Weight to .90 (you might need to play with this depending on the character).
- Change the Base Color Effect to Scatter & Transmit Intensity.
- Change the SSS Reflectance Tint to 0.79, 1.00, 1.00. (you might need to play with this depending on the character, but I like this color almost all the time).
- Scroll down on the Surfaces pane.
- Change the Transmitted Measurement Distance to .15 (you might need to play with this depending on the character).
- Change the Transmitted Color to 0.95, 0.20, 0.10 (you can definitely play with this depending on the character and skin tone you’re going for).
- Change the Scattering Measurement Distance to .015 (you can play with this setting too).
- Change the SSS Color to 0.95, 0.45, 0.55 (you can play with this setting too. In fact, you will have to depending on the character and look you’re going for).
- Change the SSS Direction to -.25 (I typically don’t mess with this and leave it set to 0, but using small negative values, such as -.1 to -.25, can be helpful if there is too much scattering effect. This can vary greatly on lighting).
- Repeat these steps for the Lips and Ears (I often do them at the same time as the Face since they use the same maps).
- Repeat these steps for the rest of the skin surfaces – Arms, Body, Legs, Fingernails, Toenails, EyeSocket, etc.
Again, play around with the settings! That’s how you’ll learn what you like and dislike and what different colors and numbers do. This is where you might think about tweaking the settings for Bump, Top Coat, and/or Gloss/Specularity. They all add up to the skin’s final results! And if you’re comfortable with Photoshop, you can even build upon the SSS map for more detail (blending tattoos into this layer can help immensely in making them look more realistic and less stickerific). Also note that I do not adjust eyes…you can easily slot in eyes from another character.
It looks like a lot of steps, but it’s really not when you get in the groove. It also really helps to save your go-to colors to the quick select in Daz. Please see the below comparison for Babina 8.
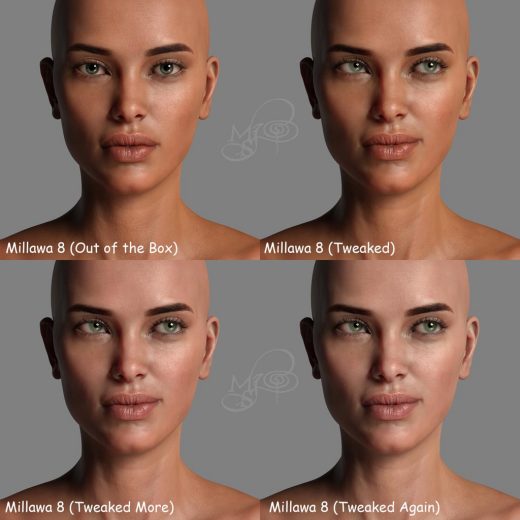
And just like with above, these steps work with darker skin tones, as shown below with Millawa 8, who has gorgeous skin out the box to begin with. My first tweaks are very subtle, but upon close inspection you can see that changing the Base Color Effect to Scatter & Transmit Intensity enhances the toning of the skin (in this case I used a color of 0.37, 0.99, 1.00 which seems really bright but it’s subtle with Millawa’s skin maps).
And lastly, we have Celani 8, another character with gorgeous skin out of the box. I changed the Base Color Effect and altered the Transmitted Color and SSS Color slightly, and the effect is very subtle. I also included a shot with her under different lighting so you can see how lighting itself has a huge effect on the same skin and settings.
In conclusion, the best advice I can give is to not rely on using things out of the box. Don’t be afraid to roll up your sleeves and dig around in the surfaces panel. Play around with stuff to see what it does. What’s the worst that could happen if you end up with something you don’t like…just undo or reload! I hope this guide and these steps help get you started on achieving the results you want when it comes to the way skin looks, whether you’re a beginner or a grizzled veteran trying to get used to Iray for the first time. In time my goal is to write more tutorials in the future that take these steps even further and build upon them. Happy Rendering!


